Table of Contents
Class Prep
Class 1
Class 2
Class 3
Class 4
Class 5
Class 6
Class 7
Class 8
Class 9
Class 10
>>Topical Articles<<
Assumed Longitude
Bowditch
Bygrave
Casio fx-260 Solar II
Emergency Navigation
Making a Kamal
Noon Sight
Pub. 249 Vol. 1
Sextant Adjustment
Sextant Skills
Sight Averaging
Sight Planning,
Error Ellipses,
& Cocked Hats
Slide Rules
Standard Terminology
Star Chart
The Raft Book
Time
Worksheet Logic
BCOSA.ca
There are three sextant adjustments you must make...and you need to make them in order.
1. Perpendicularity Error
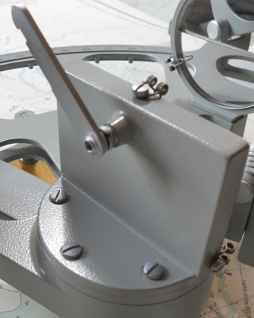
This occurs when the index mirror, at the top of the sextant, is not perpendicular to the frame.Hold the sextant on its side and move the arm to a position at 35-45 degrees. Look at the index mirror in the direction of arc (i.e. the graduated scale). We see two images of the scale: the reflected image on the left side, the direct image on the right side. We must see a straight line (the arc with the graduated scale) as in this photo:

If you see a broken line, then remove the error with the adjustment screw on the index mirror.
Look at a distant horizontal object, like a roof-line. Ideally, this object should be 3 nm away from you. (If there is nothing that far away from you, don't worry about it. Use the closer object. You can dial in this adjustment later.) Adjust the arm and the micrometer drum until the horizontal object appears as an unbroken line.
Now find a vertical object, like a flagpole or a chimney. Keeping the sextant vertical, move it slightly to the left and right. You’ll see two images, the object itself and its reflected image. As you move the sextant from side to side, they should stay lined up on top of one another. If there is side error, you will see two flagpoles side by side. If there is no side error, they will appear either superimposed on each other, or one will appear over the top of the other.
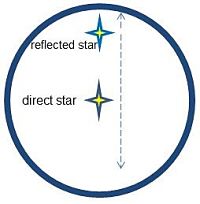
Here is an example of what you might see if you were calibrating your instrument using a star, and you had zero side error.
If you DO have side error, the stars would look like this.
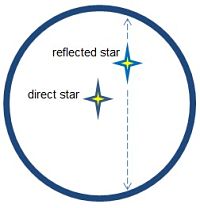
The horizon glass has two screws. Use the horizon glass screw farthest from the frame to adjust for side error.
Insert your tool in the screw and then sight the vertical object again.
Adjust the screw incrementally up or down to vertically align the actual and reflected object.
3. Index ErrorThis is caused by the index mirror and the horizon mirror being out-of-parallel to each other when the index arm is set at zero.
Adjust it out by looking at a distant horizon or horizontal roof line. Ideally, when the index arm is set to 0 degrees and the micrometer drum is set to 0 minutes, the horizontal line should be unbroken when looking at the reflected image as well as the horizontal line itself.
If you see a broken line, you must make this adjustment. Set your tool into the horizon glass screw closest to the sextant frame.
Now look at the horizon again and slowly turn the setscrew up or down until you see a straight line.
The side error screw and the index error screw are both adjusting the same mirror. You cannot remove one error without the other adjustment getting thrown out. So you will need to go back and forth in adjusting side and index error...gradually getting them closer and closer.
In the end, it will be impossible to get them both perfect. Try and remove as much of the index error as you can, and be willing to leave a little bit of side error.
A little bit of side error will not hurt the accuracy of your sights, and may even make them easier to take...since when looking at a star, you can see two of them, side by side. It can make it easier to get them to the same height.
Ofer, since your index error is so extreme to begin with (over 3 full degrees), recommend that you make your changes to side and index error screws in small increments. It could take you a half hour or more to gradually dial in your instrument.